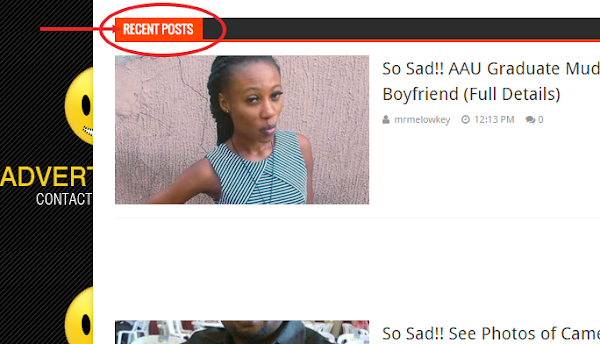
A recent posts widget is a widget that shows only Latest posts on your Blogspot website, it is for Bloggers that loves updating their blog always, it helps blog visitors navigate through your blog posts easily. The above image shows an example of a recent posts widget.
So, after reading this tutorial, you will know how to add a recent posts widget to your Blogspot website and you will be able to do it by yourself.
IMPORTANCE OF A RELATED POSTS WIDGET
A related posts widget helps your visitors to see Breaking News and alerts at just one click or without even clicking on it, and it will boost your Blog visitors. Apart from that, it also has lots of customized design that will fit your blogspot website.
It also beautifies your blog, if you are interested in adding a recent posts widget to your Blogspot website, then follow this tutorial
Step 1
Copy the code below:
Copy This
<script type="text/javascript">
function showlatestpostswiththumbs(t){document.write('<ul class="recent-posts-container">');for(var e=0;e<posts_no;e++){var r,n=t.feed.entry[e],i=n.title.$t;if(e==t.feed.entry.length)break;for(var o=0;o<n.link.length;o++){if("replies"==n.link[o].rel&&"text/html"==n.link[o].type)var l=n.link[o].title,m=n.link[o].href;if("alternate"==n.link[o].rel){r=n.link[o].href;break}}var u;try{u=n.media$thumbnail.url}catch(p){s=n.content.$t,a=s.indexOf("<img"),b=s.indexOf('src="',a),c=s.indexOf('"',b+5),d=s.substr(b+5,c-b-5),u=-1!=a&&-1!=b&&-1!=c&&""!=d?d:"https://blogger.googleusercontent.com/img/b/R29vZ2xl/AVvXsEjpEkvknXzc8Wqm1i0i96MbDLcosC84yNqgWLdaYta2G4cFf-Pax6C3NEnm3GSfbj29sOcYRI-IGHojBIBVFZizDo-UNYtv6bfF45liQ96y0RT4DHsx1MymW4SkPfd7aOOvJiU-YNCpfYJ1/s1600/no-thumb.png"}var h=n.published.$t,f=h.substring(0,4),w=h.substring(5,7),v=h.substring(8,10),A=new Array;A[1]="Jan",A[2]="Feb",A[3]="Mar",A[4]="Apr",A[5]="May",A[6]="Jun",A[7]="Jul",A[8]="Aug",A[9]="Sep",A[10]="Oct",A[11]="Nov",A[12]="Dec",document.write('<li class="recent-posts-list">'),1==posts_date&&document.write('<div class="post-date">'+A[parseInt(w,10)]+" "+v+" "+f+"</div>"),1==showpoststhumbs&&document.write('<a href="'+r+'"><img class="recent-post-thumb" src="'+u+'"/></a>'),document.write('<div class="recent-post-title"><a href="'+r+'" target ="_top">'+i+"</a></div>");var g="",k=0;document.write('<div class="recent-posts-details">'),1==showcommentslink&&(1==k&&(g+=" <br> "),"1 Comments"==l&&(l="1 Comment"),"0 Comments"==l&&(l="No Comments"),l='<a href="'+m+'" target ="_top">'+l+"</a>",g+=l,k=1),1==readmorelink&&(1==k&&(g+=" | "),g=g+'<a class="readmorelink" href="'+r+'" class="url" target ="_top">Read more</a>',k=1),document.write(g),document.write("</div>"),document.write("</li>")}document.write("</ul>")}
</script>
<script type="text/javascript">
var posts_no = 4;
var showpoststhumbs = true;
var readmorelink = true;
var showcommentslink = true;
var posts_date = true;
</script>
<script src="/feeds/posts/default?orderby=published&alt=json-in-script&callback=showlatestpostswiththumbs"></script>
<a style="font-size: 9px; color: #CECECE; float: right; margin-top: 5px;" href="http://helplogger.blogspot.com/2014/11/5-cool-recent-post-widgets-for-blogger.html">Recent Posts Widget</a>
<noscript>Your browser does not support JavaScript!</noscript>
<link href='http://fonts.googleapis.com/css?family=Oswald' rel='stylesheet' type='text/css'/>
<style type="text/css">
img.recent-post-thumb {padding: 2px; width:35px;height:35px;float:right;margin: -14px 0px 0px 5px; border: 1px solid #cea5ac; border-radius: 10%;}
.recent-posts-container {font-family: 'Oswald', sans-serif;  float: left;width: 100%;min-height: 70px;margin: 5px 0px 5px 0px;padding: 0;font-size:12px;}
ul.recent-posts-container li {padding:5px 0px;min-height:65px; list-style-type: none; margin: 0px 10px 5px 35px;}
ul.recent-posts-container {counter-reset: countposts;list-style-type: none;}
ul.recent-posts-container li:before {content: counter(countposts,decimal);counter-increment: countposts;z-index: 2;position:absolute; left: 5px; font-size: 16px;color: #4D4D4D;background: #F7F7F7;padding: 9px 14px; border: 1px solid #efefef;}
.recent-posts-container a { text-decoration:none; }
.recent-posts-container a:hover{color: #4DACE3;}
.post-date {color:#e0c0c6; font-size: 11px; }
.recent-post-title a {font-size: 13px; text-transform: uppercase; color: #5C4D4D;}
.recent-post-title { margin: 5px 0px; }
.recent-posts-details {border-top: 4px solid #AC707A; margin-top: 5px; padding-top: 5px;}
.recent-posts-details a{ color: #888;}
a.readmorelink {color: #4DACE3;}
</style>}
document.write('</ul>');
document.write('<a href="http://www.gurusblend.com/2016/12/how-to-add-related-posts-widget-to.html" target="_blank" rel="dofollow"><font size="1" color="black">[Get This Related Posts Widget]</font></a>');
}
//]]>
Step 2
To configure, change the texts in Blue to your desired, e.g: post_no = post numbers, which is the number of recent posts it will show.
2. Showpoststhumb = show posts featured image, if want to show the image beside it, leave it as true, but if you don't want to show image beside posts, then change 'true' to 'false'
and so on.
Step 3
To add it to your Blogspot website, Go to Blogger Dashboard
2. click on Layout
3. click on Add Gadget
4. From the pop up window, select Html/Javascript
5. Paste the code you copied inside, then click on save, see the image below for quick understanding.
Step 4
Save and view your Blog.
#Goodluck....


